Homemaster-MiniPLC

Product description
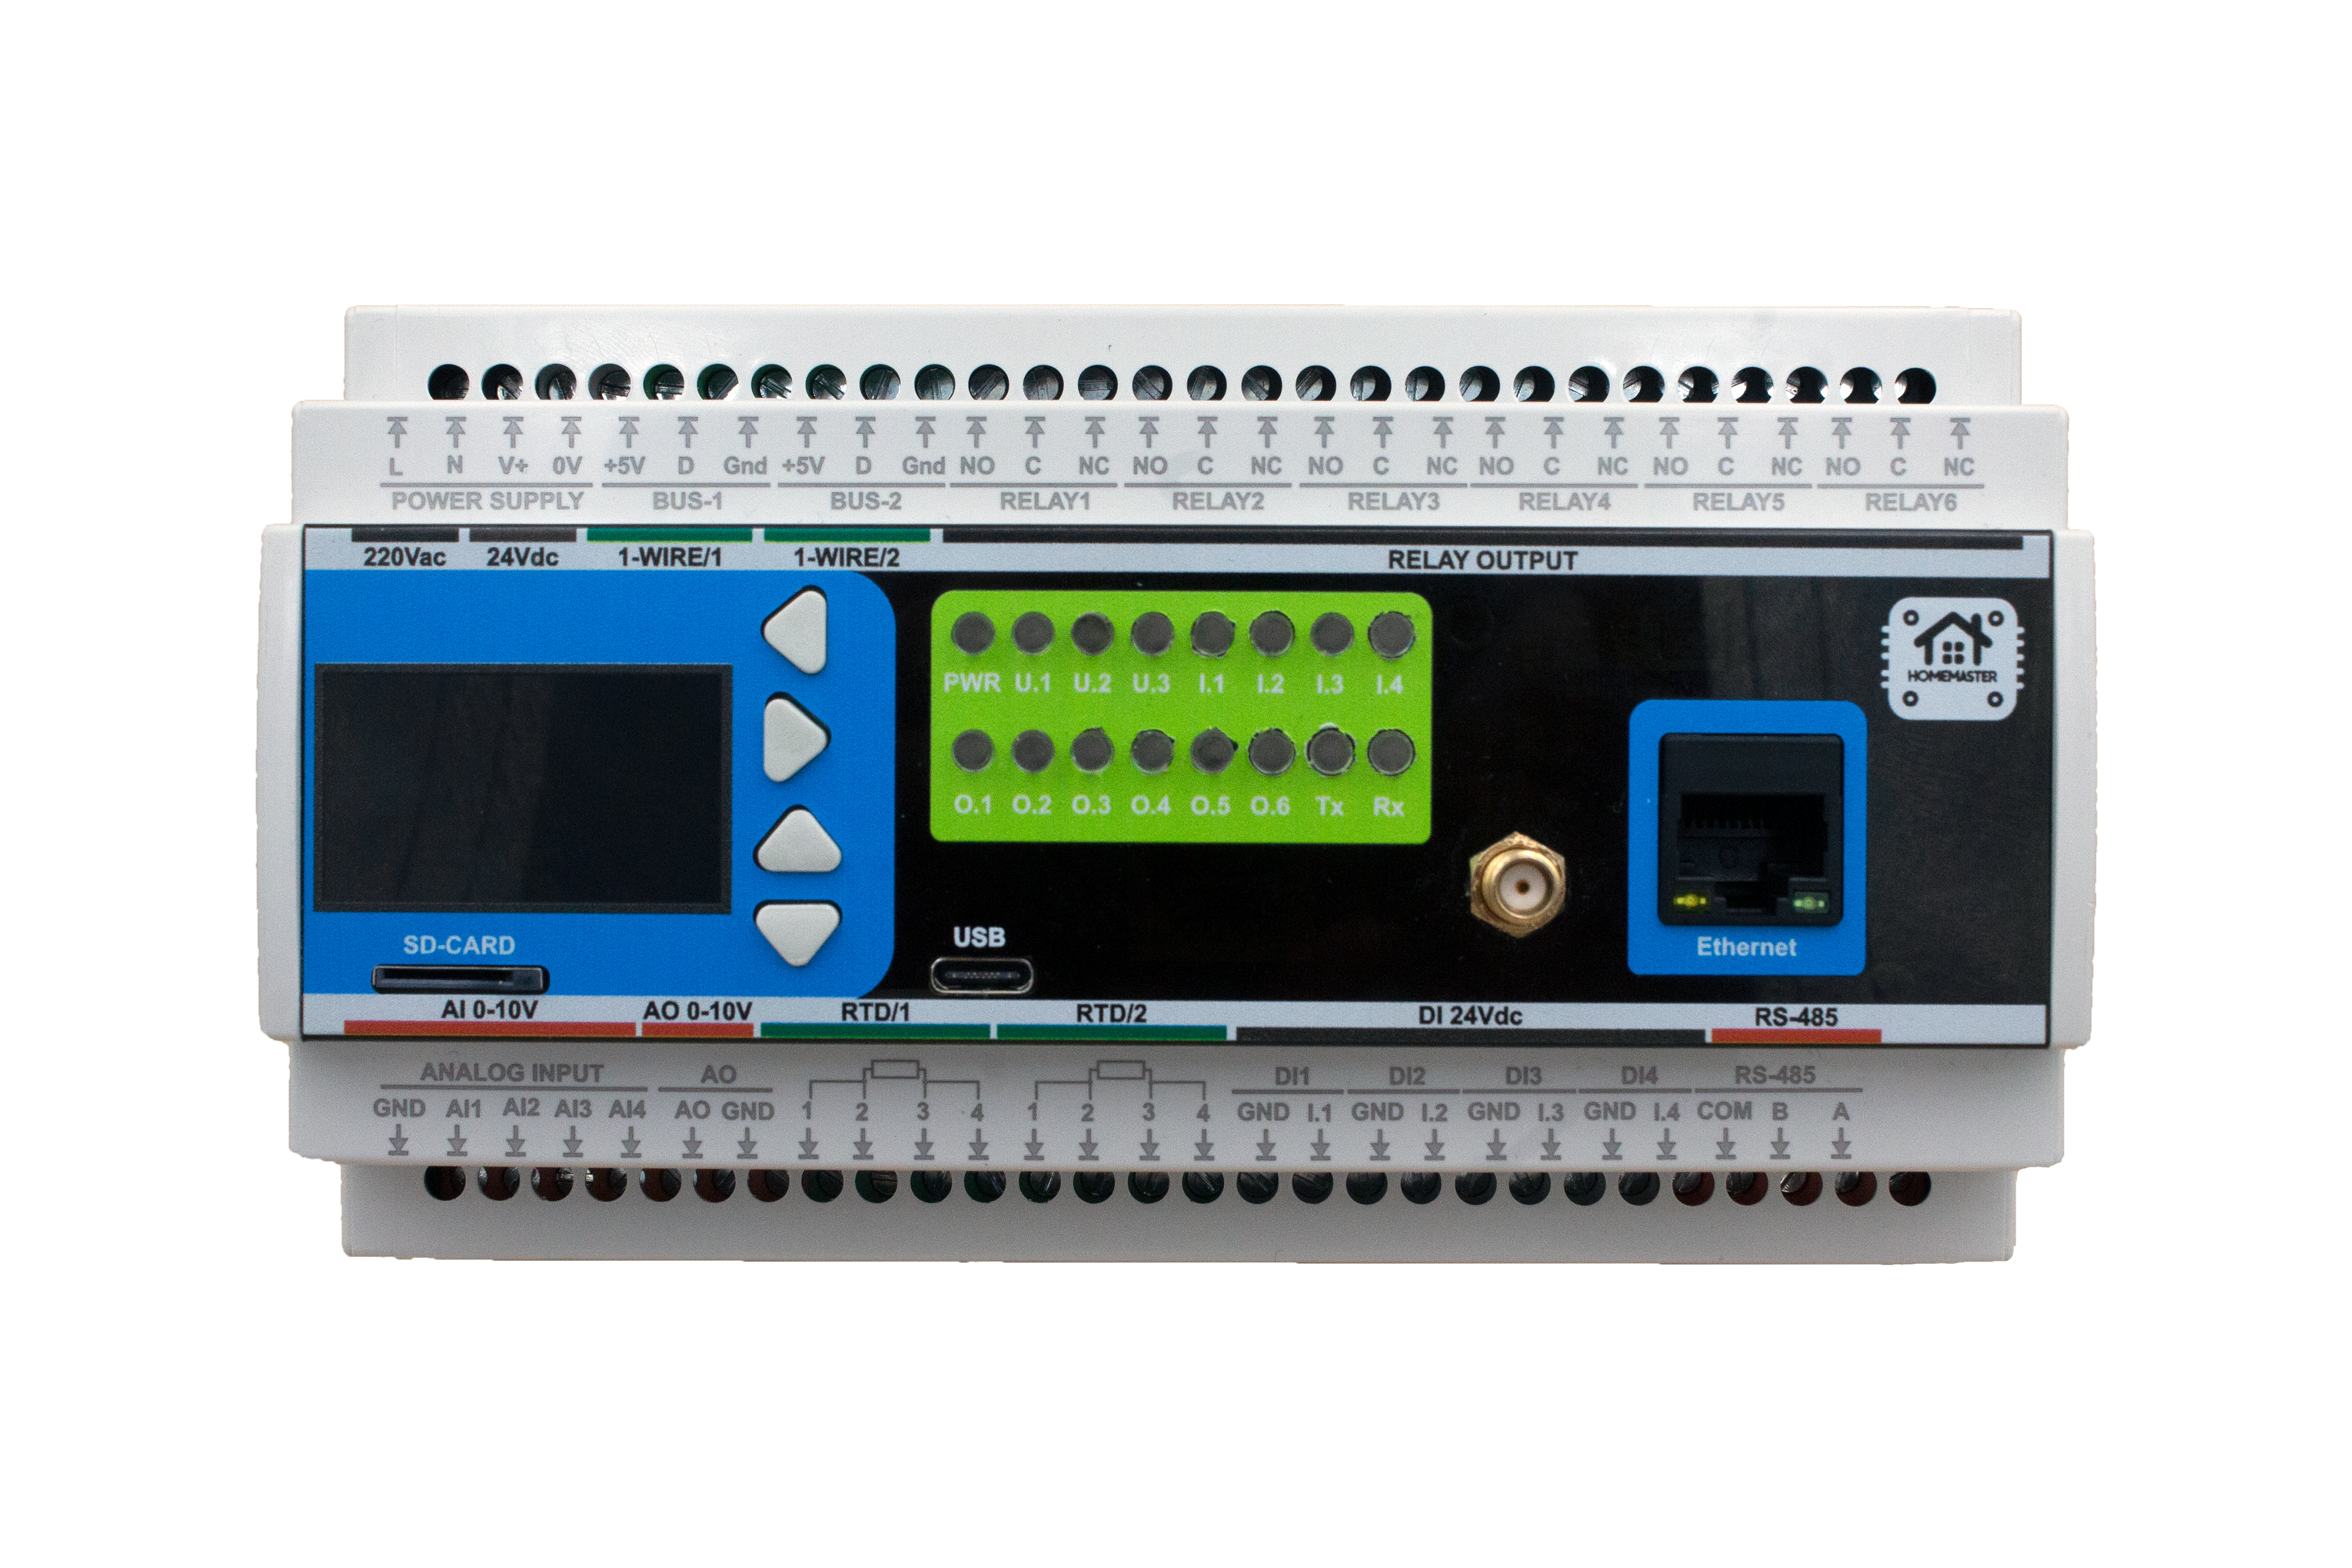
The HOMAMASTER MiniPLC is a powerful and compact automation controller designed for advanced smart home applications. Built around the ESP32-WROOM-32U
Maker: https://www.home-master.eu/
Product page: https://www.home-master.eu/shop/esp32-miniplc-55
Key Features
24V Digital Inputs – 4 industrial-grade inputs for dry contacts.
Relay Outputs – 6 relays controlled via I²C expanders for switching AC/DC loads.
Analog Inputs – 4 high-resolution 16-bit channels (ADS1115) for monitoring 0–10V signals.
Analog Output (0–10V) – 1 DAC output (MCP4725) for generating analog control signals.
Temperature Sensors – Supports 2xRTD (MAX31865) sensors.
Two 1-Wire.
User Interface – 4 front-panel buttons and configurable LEDs for local interaction.
OLED Display – 128x64 screen for displaying data and interaction.
RTC with Backup – PCF8563 real-time clock with Home Assistant synchronization.
I²C Expanders – PCF8574 chips expand digital I/O for more flexible device control.
Modbus RTU – UART-based support for extension modules.
Networking
Wi-Fi Connectivity – Integrated Wi-Fi for wireless access and Home Assistant integration.
Ethernet Support – Optional LAN8720 PHY via RMII interface for reliable wired networking.
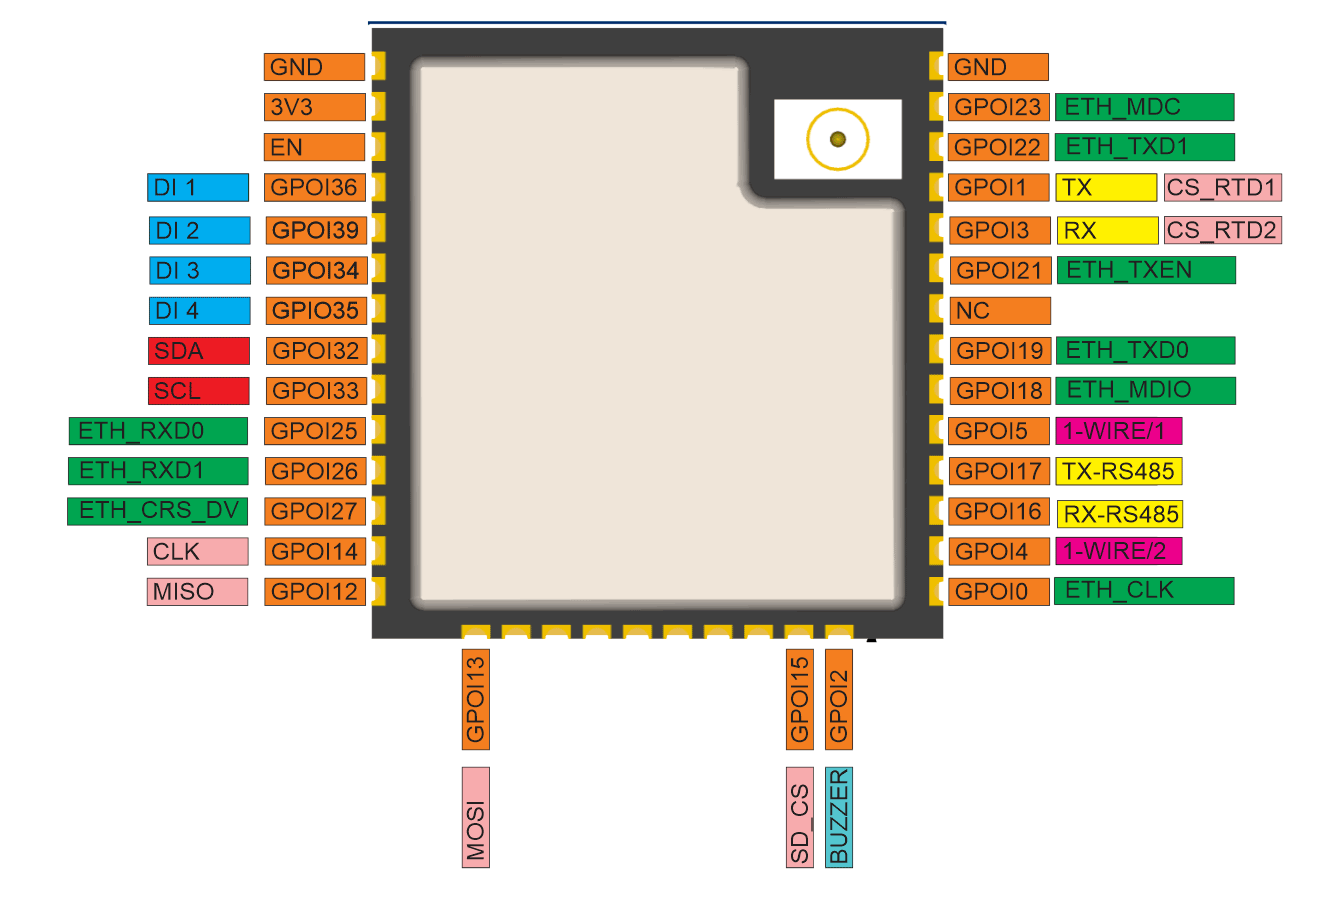
Pinout

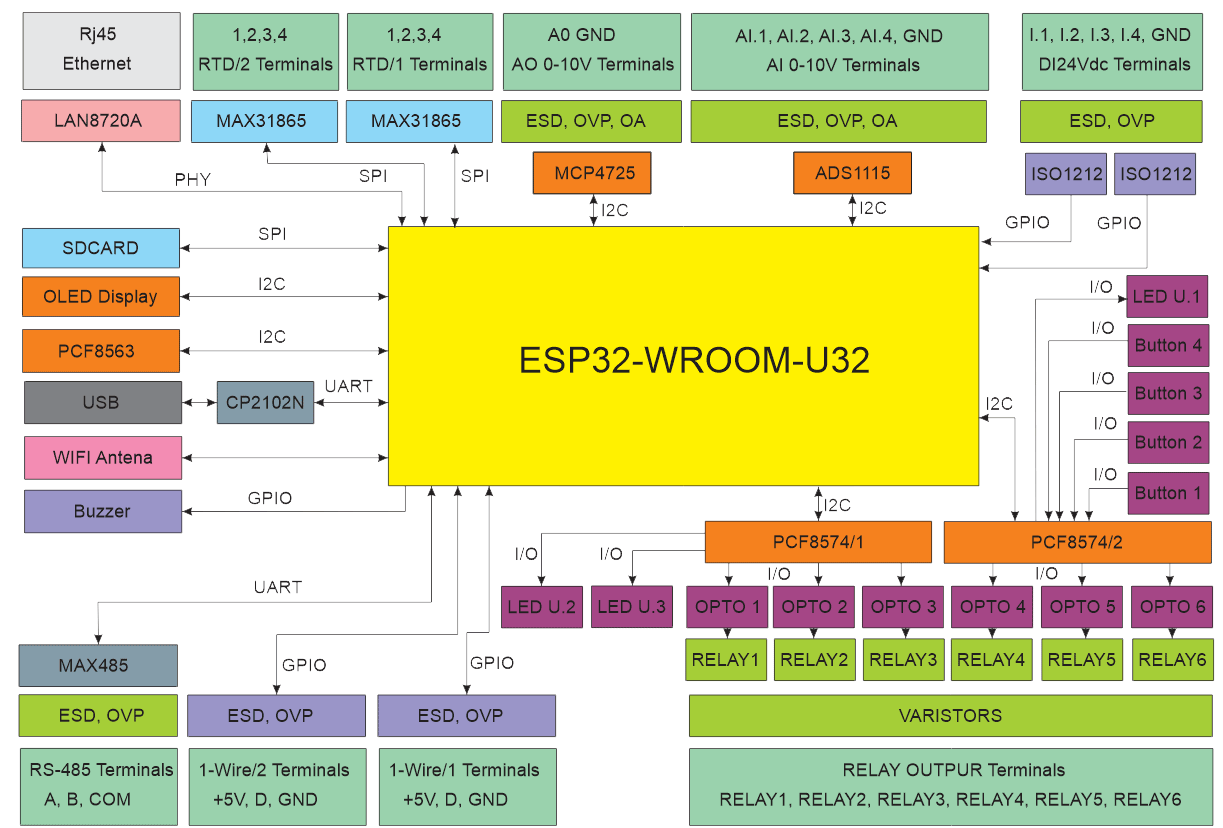
MiniPLC Functional Block Diagram

Programming
The MiniPLC comes with ESPHome pre-installed and can be programmed via:
Wi-Fi: Use the ESPHome Dashboard to upload the configuration.
USB Type-C: Use the ESPHome Dashboard to upload the configuration.
Integrated Webserver: Access the MiniPLC's IP address, upload the configuration via the built-in web UI.
Bus system configuration
I2C
| PIN | |
|---|---|
| SDA | GPIO32 |
| SCL | GPIO33 |
I2C addresses
| address | |
|---|---|
| pcf8574/2 | 0x38 |
| pcf8574/1 | 0x39 |
| ads1115 | 0x48 |
| SH1106 128x64 | 0x3C |
| pcf8563 | 0x51 |
SPI
| PIN | |
|---|---|
| MISO | GPIO12 |
| MOSI | GPIO13 |
| CLK | GPIO14 |
SPI_CS pins
| PIN | |
|---|---|
| max31865 RTD1 | GPIO01 |
| max31865 RTD1 | GPIO03 |
| SDCARD | GPIO15 |
Basic Config
# ESPHome configuration for MiniPLC
# This file configures an ESP32-based automation controller with:
# - Modbus RTU over UART
# - 1-Wire sensors
# - I2C PCF8574 expanders
# - I2C PCF8563 RTC
# - SPI-based MAX31865 temperature sensors
# - ADC inputs via ADS1115
# - DAC input MCP4725
# - OLED display over I2C
# - Ethernet
# - Web and API access
# - Multiple GPIOs managed via PCF8574 expanders
esphome:
  name: miniplc                 # Internal device name used by ESPHome
  friendly_name: MiniPLC        # Friendly name shown in Home Assistant

esp32:
  board: esp32dev               # ESP32 development board type
  framework:
    type: arduino               # Use Arduino framework (vs ESP-IDF)

# Enable logging via UART for debugging
logger:

# Wi-Fi configuration with manual static IP
wifi:
  ssid: !secret wifi_ssid
  password: !secret wifi_password

# Enable fallback web portal if Wi-Fi fails
captive_portal:

# ------------------------------------------------------------------------------
# Ethernet Configuration (optional, currently commented out)
# This section allows using a LAN8720 PHY with ESP32 over RMII interface.
# It can be used instead of Wi-Fi by uncommenting and configuring.
# See: https://esphome.io/components/ethernet.html
# ------------------------------------------------------------------------------
# ethernet:
#   type: LAN8720               # Ethernet PHY chip type
#   mdc_pin: GPIO23             # Management Data Clock
#   mdio_pin: GPIO18            # Management Data IO
#   clk_mode: GPIO0_OUT         # Use GPIO0 for 50 MHz external clock
#   phy_addr: 1                 # PHY address (check schematic/config)

# Simple built-in web server for basic status and diagnostics
web_server:
  port: 80
  version: 3

# UART used for Modbus RTU communication
uart:
  tx_pin: 17                  # Transmit (TX) pin to RS485 driver (DI pin on MAX485)
  rx_pin: 16                  # Receive (RX) pin from RS485 driver (RO pin on MAX485)
  baud_rate: 19200            # Must match the slave device's configuration.
                              # 19200 is a common industrial standard offering a good balance between speed and reliability.
                              # Use lower (e.g., 9600) for longer cables or noisy environments; higher (e.g., 115200) for faster data if wiring conditions allow.
  id: mod_uart                # ID to reference this UART bus in the modbus block

modbus:
  send_wait_time: 200ms       # Minimum time between requests (to prevent overloading devices)
  uart_id: mod_uart           # Uses the UART interface defined above
  id: mod_bus                 # ID of the Modbus master instance

# OneWire bus for temperature sensors (two separate GPIOs)
one_wire:
  - platform: gpio
    pin: GPIO05
    id: hub_1
  - platform: gpio
    pin: GPIO04
    id: hub_2

# I2C configuration
i2c:
  - id: bus_a
    sda: 32                     # GPIO32 is used for the I²C SDA (data) line
    scl: 33                     # GPIO33 is used for the I²C SCL (clock) line
    frequency: 400kHz           # I²C bus speed set to 400kHz (Fast Mode)
                                # This higher frequency is required for correct communication with the SH1106 OLED display.
                                # Lower frequencies (like the default 100kHz) may cause issues such as slow updates or no display at all.
    timeout: 1s                 # Maximum time to wait for I²C communication before considering it failed
    scan: true                  # Enables automatic scanning for connected I²C devices during boot

# Real-Time Clock (PCF8563) and Home Assistant time sync
# This ensures that the ESP32 and Home Assistant remain synchronized and allows
# for time-based automations, scheduled events
time:
  - platform: pcf8563
    id: pcf8563_time
    address: 0x51   # I2C address of the PCF8563 RTC module

  - platform: homeassistant
    on_time_sync:
      then:
        pcf8563.write_time:    # Update RTC with Home Assistant time

# I/O Expanders (PCF8574) on I2C
# In this configuration: `pcf8574_hub_a` and `pcf8574_hub_b` are used for handling buttons, LEDs, and relays.

pcf8574:
  - id: 'pcf8574_hub_a'
    address: 0x38        # I2C address for the first PCF8574 expander
    pcf8575: false       # Set to false as we're using the PCF8574 (not the PCF8575)

  - id: 'pcf8574_hub_b'
    address: 0x39        # I2C address for the second PCF8574 expander
    pcf8575: false       # Set to false as we're using the PCF8574 (not the PCF8575)

# ADC via ADS1115 (4 channels, 16-bit resolution)
ads1115:
  - address: 0x48

# SPI configuration for MAX31865 RTD sensors
spi:
  miso_pin: GPIO12
  mosi_pin: GPIO13
  clk_pin: GPIO14

# Text Sensor to Format Current Time for Display
# ------------------------------------------------------------------------------
# This text sensor is used to format the current time obtained from the PCF8563 RTC
# module and send it to Home Assistant.
text_sensor:
  - platform: template
    name: "Current time"
    id: current_time
    lambda: |-
      char str[17];
      time_t currTime = id(pcf8563_time).now().timestamp;
      strftime(str, sizeof(str), "%Y-%m-%d %H:%M", localtime(&currTime));
      return  { str };
    update_interval: 60s

# Fonts for OLED display (loaded via Google Fonts)
font:
  - file: "gfonts://Roboto"
    id: font1
    size: 8
  - file: "gfonts://Roboto"
    id: font2
    size: 48
  - file: "gfonts://Roboto"
    id: font3
    size: 14

# OLED display via I2C (SH1106 128x64)
# The OLED display (SH1106 128x64) is connected via I2C to provide a visual output
# of key information.
#
# The information displayed includes:
# - A fixed title ("HOMEMASTER") centered at the top.
# - The current time from the PCF8563 RTC, formatted as "HH:MM".
display:
  - platform: ssd1306_i2c
    model: "SH1106 128x64"  # Model of the OLED display
    address: 0x3C           # I2C address of the display
    rotation: 180           # Rotate the display 180 degrees for correct orientation
    contrast: 100%          # Set maximum contrast for better readability
    id: oled_display        # Unique ID for the display
    update_interval: 1s     # Update display every second
    lambda: |-
      # Display the title centered at the top of the screen
      it.printf(64, 0, id(font1), TextAlign::TOP_CENTER, "HOMEMASTER");
      # Display the current time from the RTC, formatted as HH:MM
      it.strftime(0, 60, id(font2), TextAlign::BASELINE_LEFT, "%H:%M", id(pcf8563_time).now());

# Binary inputs: 4 local GPIOs and 4 buttons via PCF8574
binary_sensor:
  # Digital Inputs for 24V DC sourcing devices (DI)
  - platform: gpio
    pin: { number: GPIO36 }  # DI #1
    name: "DI #1"
  - platform: gpio
    pin: { number: GPIO39 }  # DI #2
    name: "DI #2"
  - platform: gpio
    pin: { number: GPIO34 }  # DI #3
    name: "DI #3"
  - platform: gpio
    pin: { number: GPIO35 }  # DI #4
    name: "DI #4"

  # Front Panel Buttons connected to I/O expander (PCF8574)
  - platform: gpio
    name: "Button #1"
    pin: { pcf8574: pcf8574_hub_a, number: 0, inverted: true }  # MiniPLC front panel Button 1 (inverted logic)
  - platform: gpio
    name: "Button #2"
    pin: { pcf8574: pcf8574_hub_a, number: 1, inverted: true }  # MiniPLC front panel Button 2 (inverted logic)
  - platform: gpio
    name: "Button #3"
    pin: { pcf8574: pcf8574_hub_a, number: 2, inverted: true }  # MiniPLC front panel Button 3 (inverted logic)
  - platform: gpio
    name: "Button #4"
    pin: { pcf8574: pcf8574_hub_a, number: 3, inverted: true }  # MiniPLC front panel Button 4 (inverted logic)

# Switch Relays and Buzzer Configuration
# ------------------------------------------------------------------------------
# This section configures the relays (output switches) and buzzer connected to the I/O
# expanders (PCF8574) and other GPIO pins on the ESP32.
#
# **Switch Relays**:
# - Each relay is configured with a specific name and a GPIO pin on the expander to control its state:
#   - **Relay #1**: Connected to `pcf8574_hub_b`, pin number 2 (inverted logic: LOW to activate).
#   - **Relay #2**: Connected to `pcf8574_hub_b`, pin number 1 (inverted logic: LOW to activate).
#   - **Relay #3**: Connected to `pcf8574_hub_b`, pin number 0 (inverted logic: LOW to activate).
#   - **Relay #4**: Connected to `pcf8574_hub_a`, pin number 6 (inverted logic: LOW to activate).
#   - **Relay #5**: Connected to `pcf8574_hub_a`, pin number 5 (inverted logic: LOW to activate).
#   - **Relay #6**: Connected to `pcf8574_hub_a`, pin number 4 (inverted logic: LOW to activate).

# **LEDs (User-configurable)**:
# - **LED #2**: Connected to `pcf8574_hub_b`, pin number 3 (inverted logic: LOW to turn on).
# - **LED #3**: Connected to `pcf8574_hub_b`, pin number 4 (inverted logic: LOW to turn on).
# - The LEDs are **not** tied to relay status, but are instead **user-configurable** and can be used for
#   any purpose that the user requires, such as indicators, feedback lights, or status lamps for other system conditions.
# - The user can assign logic for turning the LEDs on or off based on specific requirements, such as device status or manual control.
# - The LEDs are connected to the I/O expander and can be turned on or off by controlling their respective GPIO pins.

# **Buzzer**:
# - The buzzer provides an audible notification or alarm when triggered.
# - The buzzer is connected to **GPIO02** through an **LEDC output** (Pulse Width Modulation - PWM).
# - The buzzer is controlled using a **template switch** to turn it on or off.
# - When turned on, the buzzer emits a tone at a frequency of **2441Hz** at **75% volume**.
# - The buzzer is used to signal important events or alarms in the system, such as errors, notifications, or alerts.

# **Switches (Relays and LEDs)**:
# The switches and relays are controlled through the **GPIO pins** and the **I/O expander**:
switch:
  # Relay switches for controlling external devices
  - platform: gpio
    name: "RELAY #1"
    pin: { pcf8574: pcf8574_hub_b, number: 2, mode: { output: true }, inverted: true }  # Inverted logic (LOW to activate)
  - platform: gpio
    name: "RELAY #2"
    pin: { pcf8574: pcf8574_hub_b, number: 1, mode: { output: true }, inverted: true }  # Inverted logic (LOW to activate)
  - platform: gpio
    name: "RELAY #3"
    pin: { pcf8574: pcf8574_hub_b, number: 0, mode: { output: true }, inverted: true }  # Inverted logic (LOW to activate)
  - platform: gpio
    name: "RELAY #4"
    pin: { pcf8574: pcf8574_hub_a, number: 6, mode: { output: true }, inverted: true }  # Inverted logic (LOW to activate)
  - platform: gpio
    name: "RELAY #5"
    pin: { pcf8574: pcf8574_hub_a, number: 5, mode: { output: true }, inverted: true }  # Inverted logic (LOW to activate)
  - platform: gpio
    name: "RELAY #6"
    pin: { pcf8574: pcf8574_hub_a, number: 4, mode: { output: true }, inverted: true }  # Inverted logic (LOW to activate)

  # User-configurable LEDs (not tied to relay status)
  - platform: gpio
    name: "LED #2" # MiniPLC front panel LED U.2.
    pin: { pcf8574: pcf8574_hub_b, number: 3, mode: { output: true }, inverted: true }  # Inverted logic (LOW to turn on)
  - platform: gpio
    name: "LED #3" # MiniPLC front panel LED U.3.
    pin: { pcf8574: pcf8574_hub_b, number: 4, mode: { output: true }, inverted: true }  # Inverted logic (LOW to turn on)

  # Buzzer control (using LEDC output)
  - platform: template
    name: "Switch buzzer"
    optimistic: true
    turn_on_action:
      - output.turn_on: buzzer_output           # Turn on buzzer
      - output.ledc.set_frequency: { id: buzzer_output, frequency: "2441Hz" }  # Set buzzer frequency (2441Hz)
      - output.set_level: { id: buzzer_output, level: "75%" }  # Set buzzer volume to 75%
    turn_off_action:
      - output.turn_off: buzzer_output           # Turn off buzzer

# 0–10V fan output using DAC
# In this section, the DAC is not used to control fan speed. Instead, it is used
# for generating a 0-10V analog voltage signal. This output can be utilized for
# any application requiring a 0-10V analog signal, such as controlling motors,
# actuators, or other industrial devices.
output:
  - platform: ledc
    pin: GPIO02                   # GPIO connected to buzzer
    id: buzzer_output             # ID for referencing in switch actions
    # This PWM output is used to drive the buzzer with a specific tone (frequency)
    # and loudness (duty cycle). It can be turned on/off or modulated in software.

# DAC Configuration for generating 0-10V analog output
# ------------------------------------------------------------------------------
# The MCP4725 DAC is used to generate a 0-10V output, which can be used
# for various applications requiring an analog voltage control signal.
# Examples: voltage-controlled devices, industrial control systems, etc.
# DAC output for analog control
  - platform: mcp4725
    id: dac_output                  # ID for the DAC output

fan:
  - platform: speed
    output: dac_output              # Using DAC output to generate a 0-10V analog signal
    name: "DAC 0-10V Output"        # Descriptive name for the 0-10V analog output
    # This section demonstrates the use of the DAC for generating a 0-10V signal,
    # which is sent to a device that requires an analog voltage input, such as a
    # motor or actuator, rather than controlling fan speed directly.

# Temperature sensors
sensor:
  # --------------------------------------------------------------------------
  # 1-Wire (Dallas) Temperature Sensors
  # --------------------------------------------------------------------------
  # These sensors are connected via the 1-Wire protocol using dedicated GPIOs.
  # Each sensor is identified by its unique 64-bit address and connected to a specific bus.
  # Ideal for simple and reliable ambient or surface temperature measurements.

  - platform: dallas_temp
    one_wire_id: hub_1                    # Connected to GPIO5
    address: 0x6f7c86e908646128           # Unique sensor ID
    name: "1-WIRE Dallas temperature BUS1"
    update_interval: 60s                  # Update every 60 seconds

  - platform: dallas_temp
    one_wire_id: hub_2                    # Connected to GPIO4
    address: 0xbc3c01d075cb5128           # Unique sensor ID
    name: "1-WIRE Dallas temperature BUS2"
    update_interval: 60s

  # --------------------------------------------------------------------------
  # SPI-based RTD Temperature Sensors using MAX31865
  # --------------------------------------------------------------------------
  # These sensors are connected over the SPI bus and are designed for high-accuracy
  # temperature readings using PT100/PT1000 RTDs.
  # MAX31865 performs resistance-to-temperature conversion internally.
  # Configuration includes reference resistance and nominal RTD resistance.

  - platform: max31865
    name: "MAX 31856 Temperature 1"
    cs_pin: GPIO1                         # Chip-select pin for sensor 1
    reference_resistance: 400 Ω           # External reference resistor value
    rtd_nominal_resistance: 100 Ω         # PT100 RTD (100 ohm at 0°C)
    update_interval: 60s

  - platform: max31865
    name: "MAX 31856 Temperature 2"
    cs_pin: GPIO3                         # Chip-select pin for sensor 2
    reference_resistance: 4000 Ω          # External reference resistor
    rtd_nominal_resistance: 1000 Ω        # PT1000 RTD (1000 ohm at 0°C)
    update_interval: 60s

  # ------------------------------------------------------------------------------
  # Analog Inputs via ADS1115 (External 16-bit ADC over I2C)
  # ------------------------------------------------------------------------------
  # The ADS1115 is a precision 16-bit ADC connected over I2C.
  # It provides four single-ended analog input channels (A0–A3).
  # These are used to measure external analog signals (e.g., 0–10V sensors via voltage divider).
  # Each input is configured with:
  # - Gain: Defines input voltage range (e.g., 6.144V for full scale).
  # - Multiplexer: Selects input channel.
  # - Filters: Optional scaling or calibration (here multiplying by 3).

  - platform: ads1115
    multiplexer: 'A0_GND'         # Analog channel A0 referenced to GND
    gain: 6.144                   # ±6.144V range for full-scale measurement
    name: "ADC AI4"               # Analog Input 4
    update_interval: 60s
    filters: [ { multiply: 3 } ]  # Scale raw ADC value if needed (e.g., voltage divider)

  - platform: ads1115
    multiplexer: 'A1_GND'         # Analog channel A1 referenced to GND
    gain: 6.144
    name: "ADC AI3"               # Analog Input 3
    update_interval: 60s
    filters: [ { multiply: 3 } ]

  - platform: ads1115
    multiplexer: 'A2_GND'         # Analog channel A2 referenced to GND
    gain: 6.144
    name: "ADC AI2"               # Analog Input 2
    update_interval: 60s
    filters: [ { multiply: 3 } ]

  - platform: ads1115
    multiplexer: 'A3_GND'         # Analog channel A3 referenced to GND
    gain: 6.144
    name: "ADC AI1"               # Analog Input 1
    update_interval: 60s
    filters: [ { multiply: 3 } ]

# ------------------------------------------------------------------------------
# Status LED Configuration
# ------------------------------------------------------------------------------
# This LED is used to indicate the device's operational status (e.g. booting, errors).
# It is controlled by ESPHome automatically unless manually overridden.
# In this setup, the LED is connected via an I/O expander (PCF8574), not directly to an ESP32 GPIO.
# It helps monitor system health visually on the MiniPLC front panel LED U.1.

status_led:
  pin:
    pcf8574: pcf8574_hub_a       # I/O expander used instead of native GPIO
    number: 7                    # Pin number on PCF8574 hub A
    mode: { output: true }       # Configured as output
    inverted: false              # LED logic: HIGH = ON, LOW = OFF